Oracle Data Relationship Management with external authentication
If you googled for the netjnibridge process error, you came to the right page. Scroll down to the section “Potential Pitfalls” to read about it.
After installing Oracle Data Relationship management, some clients require that DRM is integrated with their active directory system like Microsoft AD, Oracle Internet Directory etc. The good news is, it’s actually quite a simple setup to do so. However, there are a few potential pitfalls to avoid. It has to do with the architecture of DRM. Unless you are installing the latest version of DRM, 11.1.2.2, you should understand that DRM comes only in the 32 bit version. Oracle download sit (edelivery.oracle.com) shows the product in both 32 bit and 64 bit versions, but it turns out they both are one and the same. So, prior to 11.1.2.2, there is NO 64 bit version of DRM.

This seemingly simple piece of information is very critical because it accounts for an error while trying to use external authentication with DRM.
Once you have successfully installed Oracle DRM, and have configured the database connection for an application, you may want to proceed to enabling external authentication. ( I am not going into installation and configuration here as the steps are pretty straightforward and Oracle’s installation guide does a pretty good job of explaining it)
The prerequisite for enabling external authentication is the availability of Hyperion Shared Services on the same server as the one with DRM on it. Remember that we only require the foundation services of the EPM suite, and no other components. Once HSS is successfully installed and configured, make sure you are able to login to shared services using the Admin account. The next step is to decide whether you want to enable any user directories with EPM. This can be your organization’s active directory, ODI etc. Adding this in HSS will make the users available to DRM after the configuration steps below. Adding user directories in HSS is not covered in this post. After adding a user directory to HSS, you need to restart the EPM service, and should be able to test it by logging in as a Active directory user.
If you are not too keen on using a user directory at the moment, you can just add some native HSS users and should be able to test them in DRM.
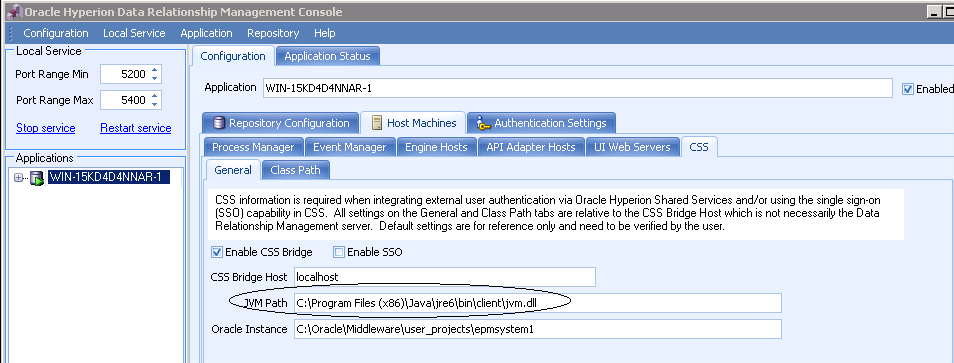
Once the above step is successfully completed, open the DRM administration console on the server where DRM is installed. Select the CSS tab under the Host machines tab, and enable external authentication by clicking the enable CSS bridge check box as shown below.

The next step is to select authentication settings tab, and the load the current settings. Here you will be able to select one of the three options for authentication. I recommend you use the mixed mode because it allows you to use your Active directory so your users can login to DRM using their network accounts, and will also give you the flexibility to create test and system accounts natively in DRM.

Once these two changes are made, you need to save changes and restart the application for them to enabled.
The tricky thing about DRM is that the users from external systems are not “Visible” in the system unless they are added manually. This is different from other Hyperion products like say Shared services, where the list of users from the external system is available readily.
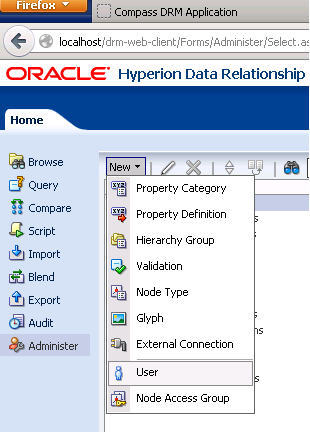
Once DRM application is successfully restarted, log in to the web-client as the administrator. From the administration section in the DRM homepage, select add users as shown below.
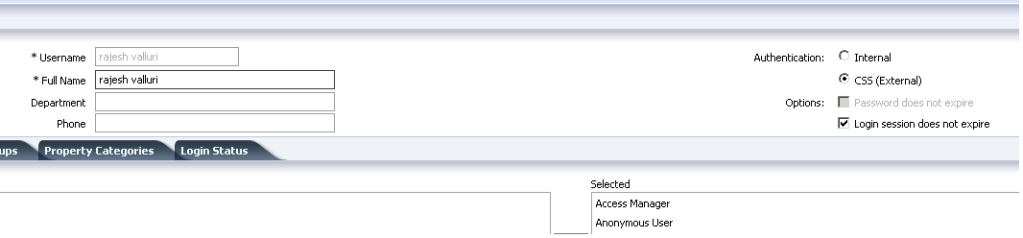
Pay attention to the options on the right hand side. You should select the user as CSS, which will automatically disable the password checkbox, and you can optionally select the session doesn’t expire based on your requirements. The most important thing to remember is that the user name being given here should be an exact match of the one avaialable in shared services. I say shared services and not the active directory because, the external users are not necessarily from the active directory. They can be the native users from shared services as well.
Once the user is added to DRM, you need to ask the users to login into DRM web client. If all works as planned, the users should be successfully logged in.
Potential Pitfall
As I mentioned in the beginning of the post, there is no 64-bit version of DRM prior to 11.1.2.2. Installing the 32 bit version of DRM on 64 bit servers is pefectly alright, but you need to install the 32 bit version of Java on that server. This is because DRM uses a JVM and DRM being 32 bit version, will not be able to load the 64-bit JVM. When this happens, DRM will not be able to authenticated external users, and when external users try to login, it actually crashes the entire DRM service. It took me a lot of painful debugging to get to the root of this issue, and its because of mistaking the 32 bit version to be 64 bit. This results in an error message in the DRM console “unable to load NetJNIBridge process”
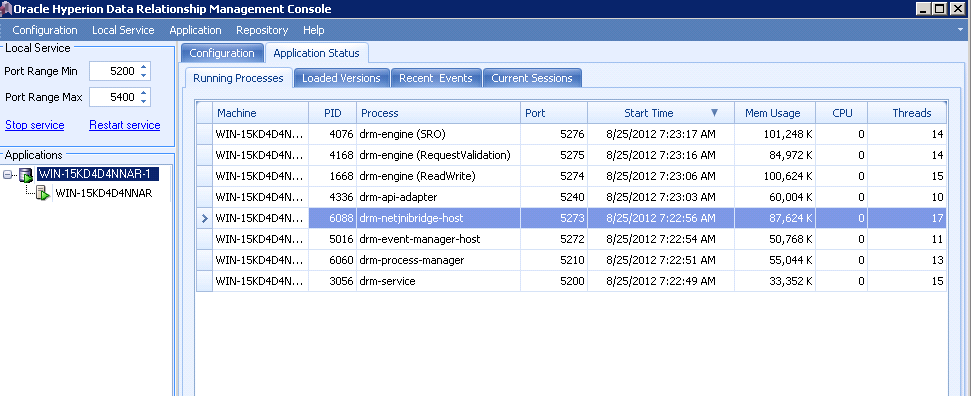
To check if your DRM installation has this issue, open the DRM admin console and click on windows event log under application settings.
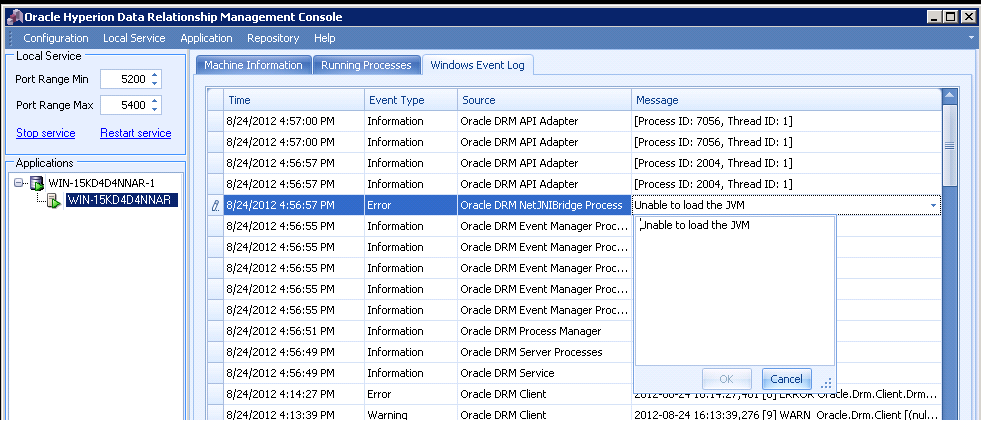
If you see this error, it is most likely that your DRM is attempting to load the 64 bit JVM. To fix this issue, simply install the 32 bit version of Java on your server. Then, update the jvm path in DRM as shown below to point to the 32 bit JVM.
After you update this path, you need to restart the DRM service and the application. Once done, make sure that the NetJNIBridge process has successfully loaded by checking the running processes.
This should fix the netjnibridge error, and your external users will now be able to login to DRM .
I am going to write about deploying Oracle DRM webservices API. Check this blog soon for that post.
Please feel free to contact me if you have any questions, and leave your valuable feedback.

Recent Comments